PLATE MAINTENANCE
PLATE MAINTENANCE
Our armor comes with a 5-year warranty and is virtually maintenance free. We have engineered our products to extremely accurate specifications to give you confidence in your purchase for a long time. You can be assured that we are using the highest and most sophisticated technology available to create next generation armor systems.
We do not store our product. We make each product to order
RECOMMENDED CLEANING PROCEDURES
Caution: Do not machine wash or dry. Failure to follow these instructions may degrade your plate performance against ballistic threats.
1. Remove loose dirt and lint from the outer surface of the plate using a cloth or soft bristle brush (never use a stiff bristle brush). Use a damp cloth if needed.
2.If further cleaning is required; apply mild detergent to the soiled areas and scrub with a cloth or soft bristle brush. Heavy grease/oil stains may be pre-spotted with a detergent mixture. Wipe the plate with a damp cloth.
For additional information, or to request a manufactures cleaning and inspection of your plate contact DFNDR Armor at america@dfndrarmor.com
Cleaning
The insert plates should be washed using cold water and soft soap. Use a soft cloth to scrub. You should avoid using hard detergents, bleach, and hard brushes.
Body armor carrier differs from manufacturer to manufacturer. Some can be dry cleaned while other cannot. Always check the manufacturer’s instructions and adhere to them.
Do not submerge your armor in water even when washing. It is advisable to keep it away from moisture as much as possible. Avoid leaving the armor outside, or anywhere it is exposed to UV radiation.
Assembling
Insert Ballistic Panels correctly. Body armor will come with directions from the manufactures on how to insert and secure the ballistic panels in place. Take your time and ensure that the panels are well placed. Wrong placement will ultimately damage the carrier.
Do not overload your carrier. Body armor comes with pockets to stash weapons and add trauma plates. Ensure every plate you add id necessary and avoid loading too many weapons on the armor. Too much weight will reduce the effectiveness of the armor and will eventually take a toll on it.
Putting on body armor and adjusting is not as straightforward as one might assume. A big part of ensuring that the armor remains protective is ensuring it fits well. While putting it on, raise the armor over your head and let it sit on your shoulders. Now strap up the shoulder straps and the waist straps. Put on the armor while sitting down to ensure it fits well and feels comfortable.
Storing
Body armor should not be put on hangers. They should be stored lying flat. Hanging armor means its weight continues acting on the ballistic materials, therefore, degrading them.
It is best to have a locker or wardrobe where you could lay your body armor. Do not leave it in the car trunk or anywhere else it is exposed to sunlight. UV radiation degrades the ballistic materials.
Always unload and disassemble all the part of the body armor before storing it. Conduct a frequent check on the body armor to ensure it is still in excellent condition. Body armor has strong double stitches around the carrier. Check these to ensure they are all still intact. Ensure you replace any trauma plates that have been hit or body armor that have been penetrated by a bullet.
These tips are meant to ensure that your body armor lasts for a long time. They do not mean that your body will remain new forever. It is therefore vital that you keep in mind the warranty period of the manufacturer. Different manufacturers offer different warranty periods. Always replace the body armor after the warranty duration has elapsed.
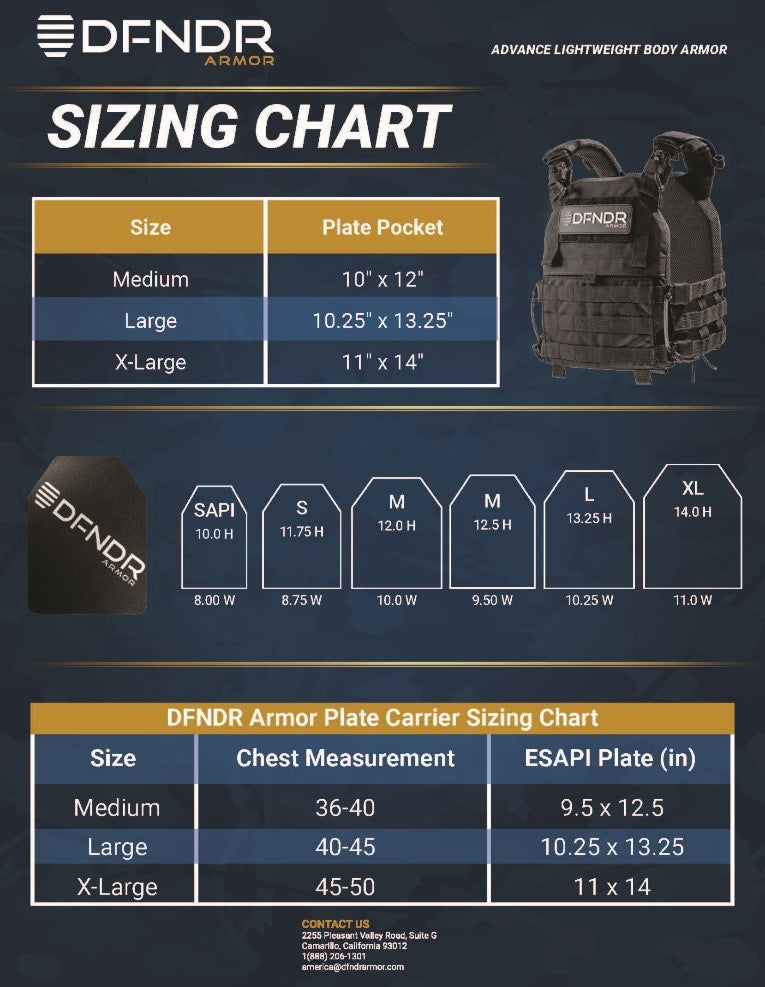
WHAT SIZE DO I NEED?
When measuring for your proper fit, keep in mind that coverage should allow you to sit comfortably, properly maintain the buttstock weld to your shoulder, and be able to stay mobile.
Plate Height: For most body types, you want to start approximately online with your collar bone and tape down the centerline of your torso to approximately two to three inches above your navel.
Plate Width: The width between your nipples is a good baseline to start with. You may need to measure slightly wider depending on your body but if the tape measure begins to wrap around the sides of your torso, you have gone too far.
Chest Circumference: Measure the circumference of your chest. Place one end of the tape measure at the fullest part of your bust, wrap it around (under your armpits, around your shoulder blades, and back to the front) to get the measurement.

 Made in the USA.
